


Pocillopora and Porites Species ID Sanger Sequencing and RFLP protocol
This post details protocols for Sanger Sequencing and RFLP assays for species identification of Porites and Pocillopora from gDNA.
Overview
This protocol contains updated and revised protocols as of 20240329 developed in the Putnam Lab and written by A. Huffmyer. This protocols is revised and based on Zoe’s PCR protocol.
This protocol uses two successive markers for Pocillopora species identification and one marker for Porites species identification.
For Pocillopora species identification, this protocol first uses an mtORF marker to distinguish between Haplotype 8a and Haplotype 1a. Haplotype 1a can either be P. meandrina or P. grandis. This protocol uses a Restriction fragment length polymorphism (RFLP) to distinguish between species in Haplotype 1a.
- Reference: Johnston et al. 2018
Porites species are distinguished through sequencing of the H2 coral nuclear histone region.
- Reference: Tisthammer et al. 2020
Pocillopora
This protocol uses Sanger sequencing to identify Pocillopora haplotypes. For samples that are identified to Haplotype 1a, an RFLP is required to further distinguish between P. meandrina and P. grandis.
Sample requirements
This protocol requires extracted and quantified gDNA. We typically preserve samples in Zymo Research DNA/RNA Shield R1100-250 and extract DNA and RNA with the Zymo Research Quick-DNA™ Miniprep Plus Kit D4069.
Equipment and supplies
Master mix and general reagents:
- EmeraldAmp GT PCR Master Mix
- EmeraldAmp GT PCR Master Mix is a loading-dye-added version of EmeraldAmp MAX PCR Master Mix that is optimized for great performance and convenience in both standard and high-throughput PCR applications.
- Loading Dye NEB 6X Purple Loading Dye NEB Cat # B7024S
- Gel Stain Biotium GelGreen Nucleic Acid Gel Stain, 10,000X in Water Fisher Cat NC9728313
- Agarose and 1XTAE buffer
- 1 Kb DNA ladder 1kb Gel ladder
- 100bp DNA ladder GeneRuler 100 bp DNA Ladder (Thermo FIsher Catalog SM0241)
- Ultrapure nuclease-free water
mtORF Sanger sequencing primers:
- Forward primer FatP6.1: 5′-TTTGGGSATTCGTTTAGCAG-3′
- Reverse primer RORF: 5′-SCCAATATGTTAAACASCATGTCA-3′
POC Histone RFLP primers:
- Forward primer PocHistoneF: 5′-ATTCAGTCTCACTCACTCACTCAC- 3′
- Reverse primer PocHistoneR: 5′-TATCTTCGAACAGACCCACCAAAT-3′
RFLP restriction enzymes:
- Restriction Enzyme XhoI R0146Sk
- Restriction Enzyme Buffer rCutSmart B6004S
Consumables:
- Pipettes and tips
- Gel electrophoresis supplies
- PCR strip tubes
- 1.5 mL tubes
- Tube racks
- Freezer boxes
Primer preparation
All references to H2O refer to PCR-grade, nucelic acid, DNAse, and RNAse free H2O.
Primer Hydration from shipped dried primers (to 200µM)
IDT’s website has a link to a “Resuspension Calculator” that you can use to hydrate the primers to a concentration of 200µM. You will need to make an account to use the calculator, and you tell it the concentration you want to dilute to (200µM) and the “OD” number in units “nmol” written on the tube of the primer, which will be different for each tube. For example, for primer zH2AH4f, the OD # was 93.5 nmol and we want a final concentration of 200µM, so we added 467.5 µL of Low TE buffer or PCR-grade H2O to hydrate. Spin the tube before opening.
Primer Dilution to 10 µM from Hydrated Primers (200 µM)
Then, make a stock solution of the primers for yourself for daily use. This will have a concentration of 10 µM:
25 µL of 200 µM primer + 475 µL PCR-grade H2O
Store in -20 ºC freezer.
1. mtORF marker - Sanger Sequencing
PCR Reaction
First, prepare the master mix. Thaw the necessary components on ice.
For all primer sets for Sanger sequencing (mtORF and H2), we used the following master mix at a 25 µL reaction volume. This can be scaled up to 33 µL if desired.
| Master Mix 25 µL reaction | |
|---|---|
| 12.55 | Emerald Master Mix |
| 10.80 | Nuclease Free Water |
| 0.32 | 10µM working stock of For Primer |
| 0.32 | 10µM working stock of Rev Primer |
| 1.00 | DNA Template |
| 25 | Total Volume |
For each amplification, you will need to have a positive control and a negative control. Ideally, the positive control is a sample of DNA that has been successfully amplified using that primer set before. The positive control is important to test that the reaction is working as expected.
For the negative control, add everything except for the DNA into the reaction (add 1 µL H20 instead). The negative control is important because it will show a sign of any contamination in your reaction, primers, master mix, or water.
- Calculate the amount of master mix needed. Do this by adding the number of samples, 1 negative control, 1 positive control, and 10% added for error. For example, if you have 8 samples and 2 controls, add 1 sample for error and generate master mix for 11 total reactions. Multiply the volume of each master mix component by the number of samples using the table above.
- Prepare master mix in a tube of appropriate volume. Load the master mix in the order of least expensive to most expensive. That way, if a mistake is made early in the master mix, you reduce the risk of losing more expensive components.
- Vortex and spin down the master mix. Keep on ice.
- Into labeled PCR strip tubes, add 24µL of master mix to as many tubes as samples you have + the number of positive and negative controls planned. Positive and negative controls could be in a separate strip tube or individual 0.2 mL tubes since they do not need to be kept after the gel imaging step.
- Using a p2 pipette, add 1µL of DNA sample to their respective tube where the master mix is added. Add in 1 µL of H2O (or nothing) to the tube for the negative control and add 1 µL of the positive control DNA to the positive control tube. You should have 25µL in each tube.
- Spin down in microcentrifuge with strip-tube attachment.
- Turn on thermocyler and login to PUTNAM (1,2,3,4) and navigate to the program (in Sanger folder) for the given primer set.
PCR mtORF program: FATP RORF, bold fields are cycled 30 times
- 60 seconds 94 ºC
- 30 seconds 94 ºC
- 30 seconds 53 ºC
- 75 seconds 72 ºC
- 5 minutes 72 ºC
- Hold at 4°C
After PCR runs (about 1 h 40 min), store at 4°C until running a gel or preparing for sequencing.
Gel to QC PCR product
- Run a gel using the Putnam Lab gel protocol from Zoe using a 1.5% gel run at 80V for 90 min. Running the gel for a longer period of time will allow the smallest DNA fragments to be distinguished clearly to diagnose any contamination or potential primer dimer.
- If using a ladder with loading dye (e.g. NEB purple ladder), you can load directly into the gel. If using a 1Kb ladder without dye and that needs to be diluted, do the following step.
- Dilute 1kb ladder: Add 6 µL H2O, 2 µL of ladder, and 2 µL of loading dye. Load 4 µL of this mixture per row.
- Load 3 µL of PCR product from each reaction into the gel. Make a map of sample location in your notebook. Add a DNA ladder to each row.
- No loading dye is needed for samples because of the green dye in the Master Mix. Use a 1kb DNA ladder. For POC mtORF, there should be 1 band at ~1000bp.
- Other bands are signs of potential contamination or off target amplification. Small bands at 100 bp could be primer dimers. Troubleshoot as necessary.
- Once gel shows a single band at expected length, proceed with clean up of PCR product.
PCR product clean up
This protocol uses an ethanol preciptation to clean up PCR product for sequencing.
- Add 2.1µL of 3M sodium acetate to each PCR reaction (1/10th the total voume)
- Add 69.3µL of ice cold 100% ethanol to each tube (3x the total volume after adding sodium acetate)
- Pipette up and down to mix and transfer entire volume to a new labeled 1.5ml tube
- Place tubes in -80 ºC freezer for 1 hour or in the -20 ºC freezer overnight
- Spin for 30 minutes at 15,000rcf (room temp). Make sure all the tubes are facing the same way (hinges out). The DNA will pellet on the back wall
- Pipette off the liquid without disturbing the pellet. It will most likely be invisible.
- Add 200µL of ice cold 70% Ethanol
- Spin for 15 minutes at 15,000rcf. This is to wash the pellet. Again make sure each tube is facing the same direction
- Pipette off the ethanol without disturbing the pellet
- Let dry at room temperature with the caps open for about 15 minutes or until all ethanol has evaporated
- Add 30µL of Tris to the pellet and pipette up and down to resuspend, go straight to nanodrop/qubit quantification or store cleaned PCR product in the -20 ºC freezer.
Quantify cleaned PCR product
There are two options for quantification of PCR product:
-
Follow Broad Range dsDNA Qubit protocol to analyze cleaned PCR product. Read standards once and record values, read all samples twice.
-
Nanodrop the samples:
- The standard Nanodrop protocol for RNA for the Putnam Lab/PPP Labs can be found here.
- Blank nanodrop with the same Tris used to elute the cleaned PCR product.
Prepare for Sanger Sequencing
Primer Dilution from 10 µM Primer Working stock to 3.2 µM for sequencing
1.6 µL of 10 µM primer + 3.4 µL H2O = 5 µL
For each primer that you are using to sequence (forward and reverse) make enough for # of samples times two so you have 2µL per reaction (e.g. 30 µL plus some extra for error)
Prep for sequencing (post PCR bench)
GSC Template to fill out, does the below calculations for you
- For Sanger sequencing at the URI GSC the amount of DNA to send them depends on how long the fragment is. The equation for how many ng to send is ((number of bases / 100)) * 1.25) * 2
- For mtORF the calculation is: ((1000/100)* 1.25) * 2 = 25. That means you’ll need 25ng of each amplification
- 25 ng is not a lot of DNA, so some of your Qubit values are likely going to be higher than 25ng/µL. It’s best practice not to pipette below 1µL, so it’s probably you’ll need to dilute the PCR product such that you can pipette 25 ng.
- The volume of liquid sent to the GSC is 12µL total, and 2µL of that is one of the primers. So you have 10µL to use for DNA. Depending on the concentrations, you’ll have to decide if a 1:10, 1:5, 1:2, etc dilution will work to pipette over 1µL for 25 ng but under 10µL.
Tube labelling for GSC:
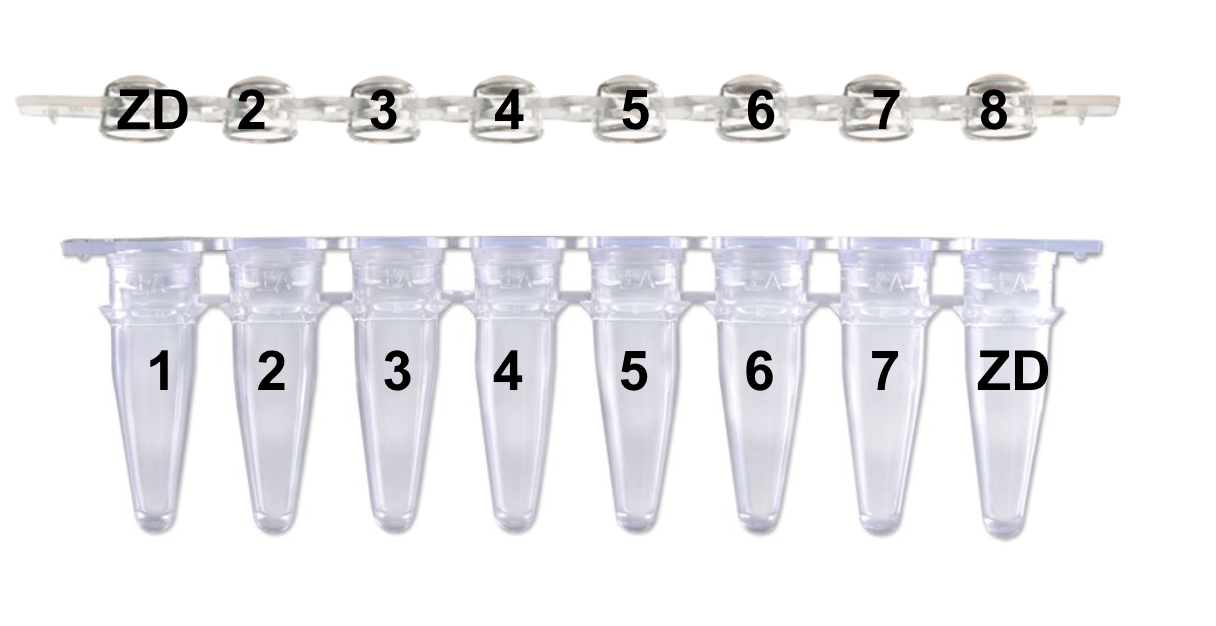
“Please identify your samples using the following code: Your initials followed by the number 1 to 9999 (i.e.: PJ1, PJ2, etc.). You should increment the number with each submission. This code facilitates instrument plate setup and data file management.” This is how Kristina taught me to label, and I would continue that pattern for #s 9-XX with the ZD on the first and last tube/lid as shown:
Steps for sequencing prep:
- Dilute DNA into new strip tubes. As an example, fill all the strip tubes (for appropriate # of samples x 2 for the forward and reverse primers) with 9µL of water and then add 1µL from each sample into the appropriately labelled tube. That would be a 1:10 dilution
- Dilute each of the primers to 3.2µM in volume for 2µL per sample (see above). Sanger sequencing amplifies the fragment with one of the two primers at a time, so you will submit two tubes per sample, one prepared with the forward primer and one prepared with the reverse primer.
- Calculate volume of DNA for each sample (use the dilution factor you used on your previous concentration values)
- Aliquot labelled strip tubes with the correct amount of DNA per sample and nuclease free water up to 10µL for each well (add water first, then DNA, then primers, always load least expensive reagent –> most expensive). Using a sample list here where you highlight off each well after adding the right amount is very helpful. For setting up forward and reverse reactions, each sample will be pipetted into two wells (i.e. tubes 1 & 2 will both contain sample POC1, tubes 3 & 4 will both contain sample POC2, so be very careful in this pipetting step because it can get confusing).
- example: 2.9 µL of 1:10 diluted DNA and 7.1 µL of H2O
- Add 2µL of 3.2µM FORWARD primer to the first tube for each sample (i.e. in the example above tubes 1 & 3) and 2µL of 3.2µM REVERSE primer to the second tube for each sample (i.e. in the example above tubes 2 & 4).
- Fill out the template linked above and print out two copies. One is for your records and can contain extraneous information such as your sample # (POC1 as opposed to the # given to GSC, ZD1), the undiluted concentration, and anything else you want to include in your lab notebook. The copy you print for GSC should have this info removed before printing. Either print this and bring it with you and add to the clipboard on the sample drop-off freezer or email this sheet to the GSC at jatoyan@uri.edu or gsc@etal.uri.edu saying you are submitting how ever many samples for Sanger sequencing for the Putnam Lab using her blanket PO (purchase order).
- Take plate/tubes up to the GSC and place in freezer next to the door. There is a place on the top shelf that with a label that says “samples for GSC sequencing”, place your tubes in that rack (right now it is purple).
2. POC Histone marker - RFLP
Haplotype 1a samples are next run through an RFLP assay to distinguish between P. meandrina and P. grandis. For those samples identified as haplotype 1a, proceed with the following protocol.
PCR of POC Histone
- Prepare the master mix using required components. A table is included below for a 25 µL reaction volume and can be scaled as desired.
- The table below shows an example for 18 reactions. Calculate the total volume required for each component with an additional 10% added for pipetting error.
| Component | Concentration | 1 rxn (uL) | 18 rxns (uL) |
|---|---|---|---|
| EmeraldAmp 2X GT PCR Master Mix | 12.55 | 225.9 | |
| POC Histone F primer | 10 uM | 0.32 | 5.76 |
| POC Histone R primer | 10 uM | 0.32 | 5.76 |
| Ultra Pure H20 | 10.8 | 194.4 | |
| DNA | 1 | ||
| Total volume | 25uL |
- Label PCR strip tubes with sample ID’s
- Add a negative control with input as 1 µL Ultra pure H20
- Add the required master mix volume (24 µL) to each reaction tube.
- Add the template DNA (1 µL) to each respective tube.
- Spin down briefly.
- Load into the thermocycler.
The PCR protocol is as follows:
- [94°C 60 secondes] 1 cycle
- [94°C 30 sec,53°C 30 sec, 72°C 60 sec] 30 cycles
- [72°C 5 minutes] 1 cycle
-
[4°C infinity]
- Store at 4°C if not proceeding to gel imaging and restriction enzyme steps next.
Gel of PCR product
- Prepare a 2% gel.
- Add 4 µL of each samples to the gel along with 4 µL 1Kb ladder in each row and 4 µL of a smaller ladder (100bp or 300bp) in each row. Samples do not need loading dye. Add loading dye to ladders if required.
- Run at 80V for 1.5 hours.
- Image the gel to evaluate the results.
- First, check the negative control to ensure there was no amplification. If there was, you may have primer dimer (~100 bp) or contamination.
- Next, check the positive controls. We are expecting a single band at 669bp.
- You should see a single band at 669bp in all samples. If there are issues at this point, troubleshoot your PCR before proceeding.
Prepare restriction enzyme master mix
- Prepare the restriction enzyme master mix. First thaw the Xhol RE and rCutSmart buffers on ice.
- Calculate the volume of restriction enzyme and buffer needed for each reaction. Each reaction requires a 0.1 ratio of rCutSmart 10X buffer to total reaction volume. The reaction requires equal volumes of rCutSmart and Xhol.
- Include a sample with Ultrapure H20 as a control for the restriction enzyme incubation.
Note that this volume is increased from Johnson et al. concentration of rCutSmart buffer. We are following manufacturer guidelines for 0.1 ratio of rCutSmart buffer.
Here are two examples. The first equation is for 15uL sample volume in the reaction (use for dilute samples or weak amplification) or for reduced 7.5uL sample volumes (use for strong amplification to reduce volume used and allow for sufficient volume for troubleshooting).
15 µL sample + 1.9 µL rCutSmart buffer + 1.9 µL Xhol = 18.8 µL total volume
	- 1.9/18.8 = 0.10

7.5 µL sample + 0.95 µL rCutSmart buffer + 0.95 µL Xhol = 9.4 µL total volume
	- 0.95/7.5 = 0.10
- Multiply the volume of each component by the number of reactions + 10% error.
- Combine Xhol and rCutSmart to generate a master mix.
- Add the required volume of master mix to each sample.
| Component | 1 rxn | 10 rrxns |
|---|---|---|
| rCutSmart Buffer | 1.9 | 19 |
| Xhol RE | 1.9 | 19 |
| Sample | 15 | |
| MM add to each sample | 3.8 |
- Incubate in a thermocycler for 1 h at 37°C followed by 20 min at 65°C with a hold at 10°C.
Evaluate results using gel electrophoresis
- Prepare a 2% gel.
- Add 4 µL of each samples to the gel along with 4 µL 1Kb ladder in each row and 4 µL of a smaller ladder (100bp or 300bp) in each row. Samples do not need loading dye. Add loading dye to ladders if required.
- Run at 80V for 1.5 hours.
- Image the gel to evaluate the results.
- First, check the negative control to ensure there was no amplification. If there was, you may have primer dimer (~100 bp) or contamination.
- Next, check the positive controls. You should see double banding at smaller band sizes for samples that are Pocillopora grandis. If you do not see cutting in the positive controls, troubleshoot PCR and/or restriction enzyme steps.
- Check the rest of the samples for banding. Samples that did not cut (single, larger band) are P. meandrina and those that did cut (multiple, smaller bands) are P. grandis.
Here is an example of a gel where cutting was seen in the positive controls and all experimental samples were identified as P. meandrina.

Porites
Equipment and supplies
Master mix and general reagents:
- EmeraldAmp GT PCR Master Mix
- EmeraldAmp GT PCR Master Mix is a loading-dye-added version of EmeraldAmp MAX PCR Master Mix that is optimized for great performance and convenience in both standard and high-throughput PCR applications.
- Loading Dye NEB 6X Purple Loading Dye NEB Cat # B7024S
- Gel Stain Biotium GelGreen Nucleic Acid Gel Stain, 10,000X in Water Fisher Cat NC9728313
- Agarose and 1XTAE buffer
- 1 Kb DNA ladder 1kb Gel ladder
- 100bp DNA ladder GeneRuler 100 bp DNA Ladder (Thermo FIsher Catalog SM0241)
- Ultrapure nuclease-free water
Porites H2 Sanger sequencing primers:
- Forward primer: zH2AH4f 5′-GTGTACTTGGCTGCYGTRCT-3′
- Reverse primer: zH4Fr 5′-GACAACCGAGAATGTCCGGT-3′
Consumables:
- Pipettes and tips
- Gel electrophoresis supplies
- PCR strip tubes
- 1.5 mL tubes
- Tube racks
- Freezer boxes
1. Sanger Sequencing of H2 marker
Follow the primer preparation steps described for Pocillopora above for H2 primer set.
PCR of H2 marker
First, prepare the master mix. Thaw the necessary components on ice.
For all primer sets for Sanger sequencing, we used the following master mix at a 25 µL reaction volume. This can be scaled up to 33 µL if desired.
| Master Mix 25 µL reaction | |
|---|---|
| 12.55 | Emerald Master Mix |
| 10.80 | Nuclease Free Water |
| 0.32 | 10µM working stock of For Primer |
| 0.32 | 10µM working stock of Rev Primer |
| 1.00 | DNA Template |
| 25 | Total Volume |
For each amplification, you will need to have a positive control and a negative control. Ideally, the positive control is a sample of DNA that has been successfully amplified using that primer set before. The positive control is important to test that the reaction is working as expected.
For the negative control, add everything except for the DNA into the reaction (add 1 µL H20 instead). The negative control is important because it will show a sign of any contamination in your reaction, primers, master mix, or water.
- Calculate the amount of master mix needed. Do this by adding the number of samples, 1 negative control, 1 positive control, and 10% added for error. For example, if you have 8 samples and 2 controls, add 1 sample for error and generate master mix for 11 total reactions. Multiply the volume of each master mix component by the number of samples using the table above.
- Prepare master mix in a tube of appropriate volume. Load the master mix in the order of least expensive to most expensive. That way, if a mistake is made early in the master mix, you reduce the risk of losing more expensive components.
- Vortex and spin down the master mix. Keep on ice.
- Into labeled PCR strip tubes, add 24µL of master mix to as many tubes as samples you have + the number of positive and negative controls planned. Positive and negative controls could be in a separate strip tube or individual 0.2 mL tubes since they do not need to be kept after the gel imaging step.
- Using a p2 pipette, add 1µL of DNA sample to their respective tube where the master mix is added. Add in 1 µL of H2O (or nothing) to the tube for the negative control and add 1 µL of the positive control DNA to the positive control tube. You should have 25µL in each tube.
- Spin down in microcentrifuge with strip-tube attachment.
- Turn on thermocyler and login to PUTNAM (1,2,3,4) and navigate to the program (in Sanger folder) for the given primer set.
PCR POR H2 program: bold fields are cycled 34 times
- 120 seconds 96 ºC
- 20 seconds 96 ºC
- 20 seconds 58.5 ºC
- 90 seconds 72 ºC
- 5 minutes 72 ºC
- Hold at 4°C
After PCR runs (about 1 h 30 min), store at 4°C until running a gel or preparing for sequencing.
Gel to QC PCR product
- Run a gel using the Putnam Lab gel protocol from Zoe using a 1.5% gel run at 80V for 90 min. Running the gel for a longer period of time will allow the smallest DNA fragments to be distinguished clearly to diagnose any contamination or potential primer dimer.
- If using a ladder with loading dye (e.g. NEB purple ladder), you can load directly into the gel. If using a 1Kb ladder without dye and that needs to be diluted, do the following step.
- Dilute 1kb ladder: Add 6 µL H2O, 2 µL of ladder, and 2 µL of loading dye. Load 4 µL of this mixture per row.
- Load 3 µL of PCR product from each reaction into the gel. Make a map of sample location in your notebook. Add a DNA ladder to each row.
- No loading dye is needed for samples because of the green dye in the Master Mix. Use a 1kb DNA ladder. For POR H2, there should be 1 band at ~1,500bp.
- Other bands are signs of potential contamination or off target amplification. Small bands at 100 bp could be primer dimers. Troubleshoot as necessary.
- Once gel shows a single band at expected length, proceed with clean up of PCR product.
PCR product clean up
This protocol uses an ethanol preciptation to clean up PCR product for sequencing.
- Add 2.1µL of 3M sodium acetate to each PCR reaction (1/10th the total voume)
- Add 69.3µL of ice cold 100% ethanol to each tube (3x the total volume after adding sodium acetate)
- Pipette up and down to mix and transfer entire volume to a new labeled 1.5ml tube
- Place tubes in -80 ºC freezer for 1 hour or in the -20 ºC freezer overnight
- Spin for 30 minutes at 15,000rcf (room temp). Make sure all the tubes are facing the same way (hinges out). The DNA will pellet on the back wall
- Pipette off the liquid without disturbing the pellet. It will most likely be invisible.
- Add 200µL of ice cold 70% Ethanol
- Spin for 15 minutes at 15,000rcf. This is to wash the pellet. Again make sure each tube is facing the same direction
- Pipette off the ethanol without disturbing the pellet
- Let dry at room temperature with the caps open for about 15 minutes or until all ethanol has evaporated
- Add 30µL of Tris to the pellet and pipette up and down to resuspend, go straight to nanodrop/qubit quantification or store cleaned PCR product in the -20 ºC freezer.
Quantify cleaned PCR product
There are two options for quantification of PCR product:
-
Follow Broad Range dsDNA Qubit protocol to analyze cleaned PCR product. Read standards once and record values, read all samples twice.
-
Nanodrop the samples:
- The standard Nanodrop protocol for RNA for the Putnam Lab/PPP Labs can be found here.
- Blank nanodrop with the same Tris used to elute the cleaned PCR product.
Prepare for Sanger Sequencing
Primer Dilution from 10 µM Primer Working stock to 3.2 µM for sequencing
1.6 µL of 10 µM primer + 3.4 µL H2O = 5 µL
For each primer that you are using to sequence (forward and reverse) make enough for # of samples times two so you have 2µL per reaction (e.g. 30 µL plus some extra for error)
Prep for sequencing (post PCR bench)
GSC Template to fill out, does the below calculations for you
- For Sanger sequencing at the URI GSC the amount of DNA to send them depends on how long the fragment is. The equation for how many ng to send is ((number of bases / 100)) * 1.25) * 2
- For H2 the calculation is: ((1500/100)* 1.25) * 2 = 37.5. That means you’ll need 37.5ng of each amplification
- 37.5 ng is not a lot of DNA, so some of your Qubit values are likely going to be higher than 25ng/µL. It’s best practice not to pipette below 1µL, so it’s probably you’ll need to dilute the PCR product such that you can pipette 37.5 ng.
- The volume of liquid sent to the GSC is 12µL total, and 2µL of that is one of the primers. So you have 10µL to use for DNA. Depending on the concentrations, you’ll have to decide if a 1:10, 1:5, 1:2, etc dilution will work to pipette over 1µL for 25 ng but under 10µL.
Tube labelling for GSC:
“Please identify your samples using the following code: Your initials followed by the number 1 to 9999 (i.e.: PJ1, PJ2, etc.). You should increment the number with each submission. This code facilitates instrument plate setup and data file management.” This is how Kristina taught me to label, and I would continue that pattern for #s 9-XX with the ZD on the first and last tube/lid as shown:
Steps for sequencing prep:
- Dilute DNA into new strip tubes. As an example, fill all the strip tubes (for appropriate # of samples x 2 for the forward and reverse primers) with 9µL of water and then add 1µL from each sample into the appropriately labelled tube. That would be a 1:10 dilution
- Dilute each of the primers to 3.2µM in volume for 2µL per sample (see above). Sanger sequencing amplifies the fragment with one of the two primers at a time, so you will submit two tubes per sample, one prepared with the forward primer and one prepared with the reverse primer.
- Calculate volume of DNA for each sample (use the dilution factor you used on your previous concentration values)
- Aliquot labelled strip tubes with the correct amount of DNA per sample and nuclease free water up to 10µL for each well (add water first, then DNA, then primers, always load least expensive reagent –> most expensive). Using a sample list here where you highlight off each well after adding the right amount is very helpful. For setting up forward and reverse reactions, each sample will be pipetted into two wells (i.e. tubes 1 & 2 will both contain sample POC1, tubes 3 & 4 will both contain sample POC2, so be very careful in this pipetting step because it can get confusing).
- example: 2.9 µL of 1:10 diluted DNA and 7.1 µL of H2O
- Add 2µL of 3.2µM FORWARD primer to the first tube for each sample (i.e. in the example above tubes 1 & 3) and 2µL of 3.2µM REVERSE primer to the second tube for each sample (i.e. in the example above tubes 2 & 4).
- Fill out the template linked above and print out two copies. One is for your records and can contain extraneous information such as your sample # (POC1 as opposed to the # given to GSC, ZD1), the undiluted concentration, and anything else you want to include in your lab notebook. The copy you print for GSC should have this info removed before printing. Either print this and bring it with you and add to the clipboard on the sample drop-off freezer or email this sheet to the GSC at jatoyan@uri.edu or gsc@etal.uri.edu saying you are submitting how ever many samples for Sanger sequencing for the Putnam Lab using her blanket PO (purchase order).
- Take plate/tubes up to the GSC and place in freezer next to the door. There is a place on the top shelf that with a label that says “samples for GSC sequencing”, place your tubes in that rack (right now it is purple).
References
Protocols were developed based on previous work from Johnston et al. 2018 and Tisthammer et al. 2020.